Framing: Terms and Conditions
In framing, like every other facet of the visual arts, there are a million little decisions to be made. To keep it simple, we will discuss only the imperative aspects of simple, cost- effective framing. The most important elements of the frame, next to the stylistic ones, are which materials you decide to use. Archival materials, though slightly more expensive, are always recommended- they will protect your work for the long haul and save you trauma down the road. And by doing some of the work yourself, you can save dollars and protect your work at the same time.
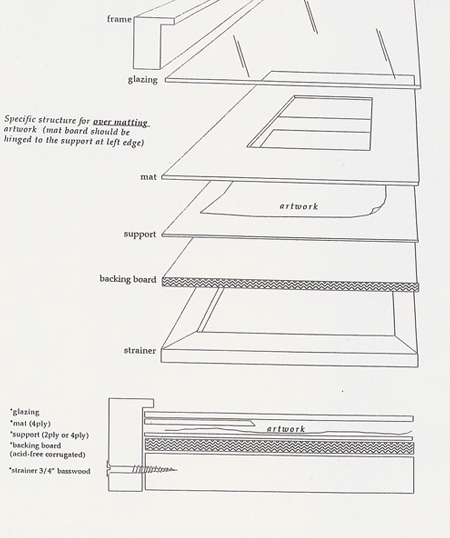
Frame components:
- Frame: aluminum sectional, commercial moulding (from a frame shop), hand-made hardwood
- Glazing: regular picture glass, regular 1/8 plexi, consevation glass, UF-3 plex
- Mat: 4, 6, or 8 ply rage board
- Support: 2, or 4 ply rag board
- Backing Board: acid free corrugated or conservation foam core
- Strainer: secondary (inner) frame made of basswood or redwood
Framing terminology:
- Frame: outermost container for artwork, both structural and esthetic.
- Mount: the means of retaining or attaching the artwork in register upon the support.
- Overmat: a border of rag board made to fit over the artworks substrate but showing the image area in a cut out window. Should be made of 4,6, or 8 ply. The mount used with an overmat should be under/covered by the mat.
- Float Mat: allows you to float your artwork, same mat as above, but mat opening or window is cut large enough to show the entire substrate of te artwork and _ of the support board. This allows the edges of the art paper to show. Float mats require that the mount be within the mat opening, thus invisible.
- Fillet: also allows for floating artwork, acts as a spacer, going between the glazing and th support. Mst be deep enough to keep glazing from touching the artwork.
- Support Board: 2 or 4 ply rag board that goes behind the artwork. This is what the artwok is mounted to. When floating your artwork, the support should be laminated to the backing board to prevent warping or bowing.
- Backing Board: a stiff board that goes behind the support to prevent warping toward the back of the frame. This board should be acid free and free of formaldehyde. Be sure to inquire about the archival materials before you buy.
- Strainer: Made of a soft and light hardwood such as basswood. This inner frame goes behind all of the components and keeps everything in the frame- usually fastened wit countersunk screws through the outside of the frame.
- Laminated Support: 2 or 4 ply rag board glued overall to the backing board to prevent warping of the support within an unsupported area (such as with filleted frames or float mats where the mount is within the opening.
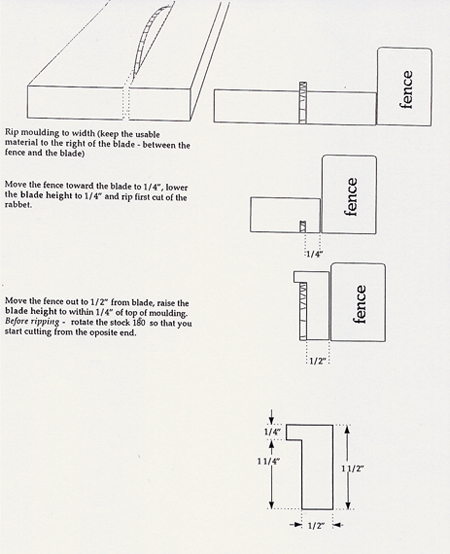
Cutting the Moulding
Overmatting
The Mount
Its not rocket science, but the mount is the most crucial of the framing elements. It must be acid free and reversible, as it is the means of attaching your artwork to a support. There are many ways to customize a mount to the particular problem of the artwork, but for most works, a simple t-hinge will do. All mounts are done with (mulberry) paper and linen tape, which is acid free, archival, and reversible. It comes in a few weights and sizes, use the smallest variety possible for your application. Click on the links below to see a few examples of mounts and their primary applications.
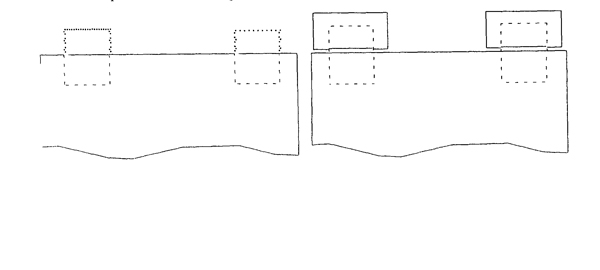
The t-hinge:
If the edges of the artwork are going to be visible (inside a window mat or unmatted), you can use this simple hinge. Tear 2 strips of dampened mulberry paper, mix up a small amount or wheat or rice paste, (or UHU gluestick) and set aside. Tear two small strips of linen tape. Fix mulberry tabs on the back of the artwork with paste so that they protrude 1/2 above the top edge (see below).
The hinges should be adhered about 1 in from the sides of the artwork. Be careful with the placement of the hinges so the cross braces dont extend beyond the edges of the artwork. Larger pieces will require more hinges across the top edge of the work to support the weight of the paper. In pencil, lightly mark the alignment of the artwork on the backing board. Remove the artwork and glue the bottom part of the paper hinge to the matboard, securing with a cross brace of paper along the top edge. Allow to dry briefly.
Reposition the artwork; weight with book to hold in place. Gently pull back the top edge of the artwork and apply glue to the top flap of the hinges. Slip a scrap of glassine between the top and bottom layers of the hinge to prevent it from adhering to itself during drying. Lower the artwork into place Weight down hinge area while drying for 30 minutes.
Other mounts
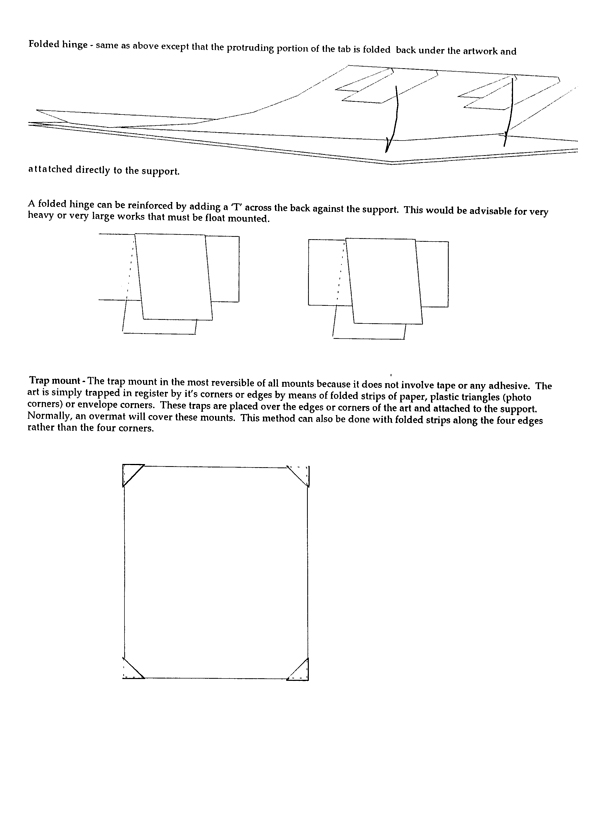
Mounting works on paper
Canvas Support:
- Build a stretcher 1/8 to 1/4 larger than the dimensions of the work on paper.
- Stretch the canvas, staple all the way around to the back side (not on the sides!!!)
- Size the stretched canvas wit rabbit skin glue or other PVA sizing. Let it dry completely- overnight.
- Unstretch the canvas, lay it out flat, and coat the front surface (not the sides) with white glue thinned slightly with water. Make sure both surfaces are free of dirt, oil, and grease before applying the glue. For an archival reversible bond, use wheat or rice paste as the glue.
- Coat the back of the work on paper with the glue/water mixture as well.
- Press the surfaces together, making sure you remove all the air bubbles and wrinkles.
- Protect the surface of the artwork (glassine, plastic, masonite). Apply even pressure with weights (such as cinder blocks) while the glue is drying. Let it dry overnight.
- Restretch the canvas onto the stretcher, staple all the way around the back. You should have 1/8 to 1/4 border of clean canvas all the way around the art work (including the sides). Visually this does not require any further framing.
Rigid Panel Support
- Build a panel 1/8 to 1/4 larger than the maximum dimensions of the works on paper. You can use masonite, luan, plywood, 1/8 or _ thick. Use wite pine or fir for the support pieces. The supports can be any depth you desire.
- Miter cut 1x2s or 2x2s according to the exact dimensions of the finished panel.
- Using wood glue and a right angle, assemble the panel frame.
- Allow about an hour for the wood glue to set.
- Following the directions on the glue bottle, dampen the top surface of your frame with water, and then spread a generous amount of glue to cover the surface of the frame.
- Place your masonite on the frame, allowing _ of overhang on all sides.
- Use clamps or cinder blocks (or othe heavy objects) apply an even amount of pressure all the way around the edges of the masonite board.
- Allow at least four hours of uninterrupted drying time under the weights (preferably 24 hours).
- Drill one hole on each corner of the panel frame using a counter- sink drill bit, then put a screw in each corner for added support.
- Using your router (with straight bit), trim the excess masonite from the panel, leaving a flush edge where the panel meet the frame. (wear a dust mask and goggles)
- Sand down the edges and scrape away any excess dried glue from the sides of the panels.
- Size the masonite panel with with either PVA sizing or gesso, or stretch canvas over panel and sie that.
- You can now mount your work on the finished panel using thinned white glue.