|
Running Java Programs
Prereq: 1) Install Jbuilder 2) Read Ch. 1, pp 12-36
At the end of this you should be able to:
1. Open a Jbuilder Project
2. Add a new Applet to the Project as a .java file
3. Cut and Paste code into a Java Applet
4. Run, Edit, and Re-run the program
5. Alter the HTML file and run it in Internet Explorer
6. Run your Applet in your own web page
7. Load programs from files. Save your work
8. Use Windows Explorer to trace files and run Applets
9. Make, Load, and Run a simple Java Application
At this point, you know a little about computers, what they can do, and about programming languages. Programming languages, that fill the program workspace of the computer, are used to teach the computer how to solve the desired problem. It is the programmer’s job to write these instructions. All programming languages are the same, in that they are equally powerful in what problems they can solve. They differ in how easily the instructions can be written and how fast they can be executed. We will look at running Java code in this lesson. In the next lesson we will explore why we chose Java over the hundreds (or thousands) of languages that exist.
First, enter Jbuilder by clicking on the Desktop icon or selecting Jbuilder from the Programs Menu. After some time loading, you should see the following at the top of your screen:

If you do not see this, you are not running Jbuilder, or it is minimized. Check to make sure Jbuiler is correctly installed. You may also see several other
windows. Your book talks about these windows. For now, we want to create a new project. Do the following procedure:
1. Select File/New Project from the Jbuilder Menu. See this:

2. Fill this form out with the best info you can, or leave it, except for the File: box. Note this is where your project will be and what it will be called. Untitled is not a good name. Change the line to: C:\JBUILDER3\myprojects\FirstProject, then click the Finish button.
3. You will see this:
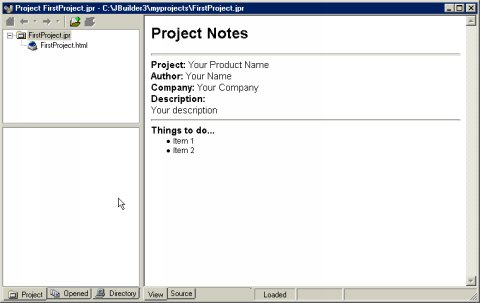
This is an HTML document for information purposes only. You should recognize the information if you entered it on the previous page. Lets’s see what happened:
4. Right click on the Start button and select Explore. Go to the C drive (if that is where you installed Jbuilder) and the Jbuilder3 folder. Open the myprojects folder. See this:

You will need to be able to do this task later to make sure your files are in the right place. You can right click on one of the files, select Properties and look at the time created. The file on the left is an HTML document with info on your project and you can think of the left file as a folder holding all the files in your project (though this is not exactly correct..) We now want to make a java Applet.
5. Go back to Jbuilder. Select File/New from the menu. (Make sure you have the Jbuilder menu) You should see:

You can explore the other tabs, but it is the New tab you want, and you should double-click on the Applet Icon. You get this Dialog box:
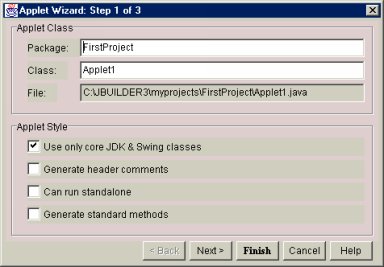
We will not use a Package for now, so you can delete FirstProject from the Package TextBox. Change the contents of the Class TextBox to FirstApplet. Note the File Textbox is gray and you cannot change it. It was set when you made your project. Leave the checkboxes alone for now and click Finish. You will see the following:

Jbuilder tried to format the code for a standard Java Applet for us. This might be helpful at times, but we do not need it. In the Content pane, where the code is, select all of it and delete it. We are now ready to cut, paste, run, edit and rerun Java Applets!
Now we will look at some programs to run. Do not worry about how they were written or how they work at this time. We will get to that soon enough. It is CRITICAL, however, that you can run and fix programs ASAP! If you cannot run programs on your machine, you are dead in the water and must get help immediately! Unfortunately there are hundreds of things that could go wrong based on your system and software. Use the HELP! Link to get your problems solved right away so you can proceed in learning Java. It is a real MESS to have system issues that interfere with your learning of Java. Please get in touch with me if you cannot resolve your problems running programs through the HELP process. Proceed with the following process now:
1. Copy the following text, or open the Hello1.java program from you disk in notepad and copy it there.
import java.applet.Applet;
import java.awt.*;
public class First extends Applet
{
public void paint (Graphics g)
{g.drawString("Hello world");}
}
Your screen should look like this:

2. This program has an error in it. We will try to run it anyway. At the top of the Jbuilder window are several toolbar buttons. Find the green triangle that points to the right. Move your mouse over it and notice a message that pops up saying this is the Run button, and you can use F9 as the shortcut key. Explore the other toolbar buttons, but don’t click on any. Do click on the Run button. You will see something like the following:

3. Notice the red circles with a white X in them. These are error messages. We will fix them in a sec. If you do not see the window at the bottom, Go to View/Message View on the Jbuilder menu. You might also see some other stuff, like yellow triangles saying Warning. You probably will not have this unless you had previously entered Java programs. To get rid of the Warning messages (which will not keep your program from running), go to the Jbuilder menu, select Projects/Properties and then check the synchronize output directories box. Then re-run. Your Message Box should now look like the one above.
4. Lets fix the errors now. It says:
Error (4) class First is public, must be declared in a file named First.java. This is a common but VERY IMPORTANT problem. In Java, the name of the class must match EXACTLY, including case, with the name of the file. Look at your project. The .java file is called FirstApplet.java. Now look in the content pane at the line:
public class First extends Applet
The name of the class in NOT FirstApplet, but First. Java cannot find the file to run! Change the word First into FirstApplet: public class FirstApplet extends Applet. Now rerun.
5. Better, but not perfect. There is still a message complaining about drawString not being found. We will talk more about this in the Applet Output lesson, but for now, we can just fix the problem: Change:
{g.drawString("Hello world");} into
{g.drawString("Hello world",10,10);}
We told the computer to draw, but did not tell it where. This will print the message Hello World at a distance 10 over and 10 down from the top-left of the browser screen. Now, run the program.
6. If all goes well, you should see a black DOS screen appear. It is loading a program called AppletViewer which is a mini-browser. Then you should see ‘Hello World’ on the screen. If this did not happen, you may still have a typo you need to fix. Look at the error messages and try to figure them out. Get HELP! if you start to thrash right away. Now, try to change the text inside the quotes. Try to move the display around the screen by changing the 10,10 to other numbers. Try putting several g.drawstring statement together, but make sure both are between the {}. For example, replace {g.drawString("Hello world",10,10);} with:
{ g.drawstring(“My name is Ab”,50,50);
g.drawstring(“I live in Steilacoom”,70,70); }
Lets see what happened. Open Windows Explorer (right click on Start). Go to the Jbuilder folder and open the myclasses folder. You will see a file with your browser’s icon called FirstApplet. Right click on it to see it is an HTML file. Also, find a file called FirstApplet that has an icon with a green lightningbolt on it (Borland’s icon for a class file). Check its properties. Now lets run the program. If you doubleclick on the Class file, you will get an unpleasant surprise. Not only will the program not run, but it may try to load itself back into Jbuilder (a process called decompiling that is prone to errors). What you Want to do is to run the HTML file because an Applet is called from the HTML file. As long as the .class file is in the same location as the HTML file that calls it, the .class file is loaded and run on the web page just like a gif picture is loaded and displayed. Let’s try. Double-click on the FirstApplet HTML file. HURRAY!! In your browser, click on View/Source. You will see something like this:
<APPLET
CODE = "FirstApplet.class”
WIDTH = 400
HEIGHT = 300
</APPLET>
You may see other stuff as well. This is the html call to your applet. One problem you may have is that the html file and the .class file it calls are not in the same directory. Use Windows Explorer to check and fix this. The name of the html file does NOT need to match the name of the .class file. Return to Jbuilder. Click on the FirstApplet file in the Navigation pane. Make sure that the Project tab below the Structure pane (see your book) is clicked and not the Opened tab. Now, look at the bottom left corner of the content pane. Find 2 tabs, View and Source. If FirstApplet.html is selected, click on the Source tab. Voila! Although your .class and .html files are saved, you can save the .java file from the File/Save menu. Make sure you save backup copies.
Running a Java Applet from YOUR web site.
Later in the class I will have you post some Applets for the rest of the class to play with. Check the SetUp lesson for how to make a website at Geocities. What you will need to do is to make a web page with the applet call and upload the .class file it calls using the upload command. You can have other html text and pictures on the page as well as your Java applet. I am going to let you play with this on your own. Use HELP! if you are having troubles.
Loading and running Java Applets from Files
I will give you some programs to run on the local hard drive at Evergreen. Copy these to your floppy or zip disk. Look at the folder called ‘running java programs’. Open this folder. Open Jbuilder and open the FirstApplet project by clicking on File/Open and navigation to the Jbuilder/myprojects folder. Make sure you open the project and not the .java (move your mouse over the file to see what type it is if you do not recognize the icons). We can add new files to the project by clicking the Add button at the top of the Navigation pane:

Notice the green + sign and the red – sign at the top of the picture. These buttons add and remove files from your project. Click on the Add icon. Find a .java program on your floppy disk. Load it. You cannot run it now, however. First you need an html file that calls it. You can use FirstApplet.html. (FirstProject.html will not work because it is in the myprojects directory, not the myclasses directory where the .class files are located) Click on the FirstApplet.html file. Make sure you have the Projects tab and not the Opened tab on the bottom left of the screen. Now click on the Source tab in the bottom left of the content pane. Note the call to the FirstApplet.class file. Change this to the name of the class you have loaded and save the new html file. Now go back to the .java file you added to the project. 2 icons to the right of the Run icon is the make icon, which looks like a folder. Click this. Error messages will appear if there are problems. If not, a .class file was produced. Now highlight the FirstApplet.html file you just changed. Click on run. Your new applet will take off!
Some applets will need more than 1 .java file to run. When you load a file, look the the import statements at the top. If they say java in them you do not need to worry. If there is something else there, you will need to find and add the imported file into the project. Your current .java uses this imported class when it runs. It is not always this simple, but try this and if it does not work, back up and punt..
Some programs will need pictures, sounds, or movie files to run. You can put these resources into the myclasses directory and they will be found and used by the running Applet.
Your book walks you through making a new Application. Unlike the Applet, the Applicaion does not need an html file. It runs on the local machine. We will spend most of our time with Applications after a couple of weeks with Applets. You can load and run an Application in Project FirstProject easily. Click on the Add icon (green + sign). Find the application HitMiss on your floppy disk. Load it. Since it is an application, you can run it without an html file. Just click on the Run button. Can you see the difference between an applet and an application from the code?
To Do List for this Lesson
1. Adapt the above programs. Run and fix them
2. Run Applets and application from the Running Java Programs folder you copy from the lab. Look at the code. Make guesses as to how it works.
3. Check out sample applets on the web. Go to www.gamelan.com, or www.jars.com, or several other sites. Try a search through google.com for Sample Applets. You can often get the code for these. See if you can get them to run in Jbuilder. Let the class know what you found out via email or GWIFO.
|
