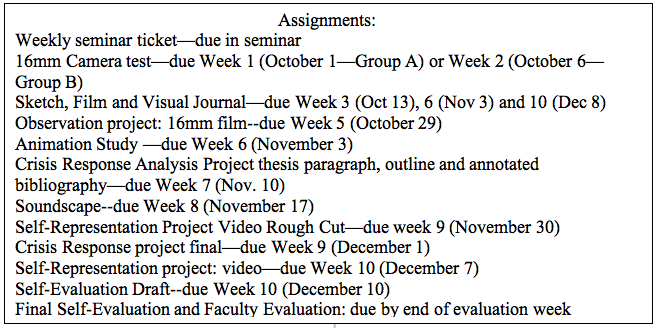
SEMINAR TICKET ASSIGNMENT (approximately one page, typed, due each week in seminar)
-List 3 main ideas that you got from each text that you read for the week’s seminar
-Select a quotation from each text which addresses a key issue you want to see discussed in seminar
-Use your 3 ideas and your quote to frame a question for each text that will be conducive to seminar discussion
-Write a paragraph about how the week’s readings impact your thinking about the theory and/or practice of media
SKETCH and FILM/IMAGE/PRODUCTION JOURNAL
The journal is the place for you to record a significant amount of content that we cover in the program, as well as your own ideas and responses. It will include: drawing exercises, illustrated class notes, journal entries about images, films, videos and audio works, and notes and sketches for various productions that you undertake. You will turn the journal in for review week 3, week 6 and at the end of the quarter.
- Choose a spiral bound sketchbook, minimum 8” x 10”, maximum 9” x 12”. Put your name and contact info on the outside cover of the sketchbook.
- Take written and visual notes for each film, video or audio work presented in class. Include the title, director or studio, year, aesthetic or historical context in which it was made, context for viewing (usually given through lecture in class), media and techniques used, sequence of imagery, possible meanings for and effects on viewer including yourself, allusions and associations, and discussion comments you find relevant. Your visual notes could include sketches of people, places, shapes, motions, and/or compositions, or even diagrams of temporal structure. This is not the place to “review” works by trying to judge whether they are good or bad, or whether you like them or not.
- If follows from # 2 above that you should also use your journal to take notes on lectures and seminar. You may decide to use the journal for your notes on readings. This is optional, but highly recommended.
- During technical workshops, take written and visual notes on concepts and techniques presented.
- Use the journal for preproduction notes and designs for media production assignments.
- After some of the drawing workshops, you will have short homework assignments in the form of drawing exercises. Do these in your journal
- Other assignments and tasks TBA.
FILM OBSERVATION ASSIGNMENT
“Imagine an eye un-ruled by man-made laws of perspective, an eye unprejudiced by compositional logic, an eye which does not respond to the name of everything but which must know each object encountered in life through an adventure of perception. How many colors are there in a field of grass to the crawling baby unaware of ‘Green’?” (Stan Brakhage, Metaphors of Vision).
“We must recover the world; we live as if coated with rubber.” (Victor Shklovsky, quoted in Kino Eye, xxv).
For this assignment you will work in groups of 2-3. You’ll have 2 rolls of black and white reversal film per person (minus the roll you shot as practice). Your finished, edited film will be 2-3 minutes long, and will be projected without sound. The assignment is due Friday, October 29th, week 5. We will screen completed projects in class that day.
This nonfiction assignment is built around observation—it is a study in seeing cinematically with the Bolex camera. You can pick an object, an event or process, a place, or even a sensation or experience for your subject matter. But whatever you choose, expect to spend a good deal of time and thinking about it, exploring and experimenting with different ways of seeing and planning how to communicate what you see.
Here are some ideas to consider: Joris Ivens writes of his absorbed, intense observation of the bridge. He isolated different elements of this vast structure and sought out angles, perspectives and focal lengths that communicated both form and function. He wrote about the importance of repetition, which gave him the ability to film a motion multiple times. In his study of the rain, he focused both on the “event” of a rain shower and on the experience of “wetness.”
In “Field” John Berger discussed the field as a bounded area in which events occur. The events are noticed first, but their connection to one another is established by inhabiting the same place, a place that can be separated off from what surrounds it. His essay focuses on the bounded space that we usually don’t notice, but that becomes an increasingly important focus of our attention.
And as we discussed in class this week, Vertov approached the camera as the perfectible eye that could see and represent aspects of reality that the human eye failed to perceive on its own.
Preparation:
Begin with a conversation or series of conversations with your project partners. As you develop your ideas, talk about how you would render them visually and in time. Be sure to consider technical problems that could arise. Will you have enough light for the subject matter you are choosing? Will you have time and enough film to repeat shots? Will you be constrained physically to a limited perspective or camera placement?
You might practice taking light readings and observing—with or without a camera—without actually filming at first. This is a process that’s fairly common for nonfiction filmmakers, who must spend time observing before they understand something well enough to film it.
Make a shot list—or story board—for your film. A shot list is a verbal list of the images you want, characterized by angle, focal length of lens, and camera movement. A storyboard is a series of sketches of the keyframes you intend to film, paired with notes about the length of the shot and screen direction. This is important preparation—even though, once you are filming, you will get new ideas and may discard some of the ones you planned out beforehand.
Be sure to log your shots as follows:
Shot number (content and footage count)—Lens—Exposure—Compensation—Notes
You should have your logs with you at all screenings and editing sessions—place them in your sketch book.
Pay careful attention to exposure and consider which capacities of the camera will be most appropriate to your subject.
Consider the variety of shots you will need for editing. Changes in angle of view and focal length help you to join shots together smoothly and without visual breaks. Consider screen direction (in what direction are objects moving) as well as the movement of the camera and how you might manipulate time. Consider the visual and formal differences and oppositions Ivens discusses in “Holland.” Consider also his notion of “visual motifs.”
Pay attention to group process as well as your film product. Make sure everyone participates in the planning process and gets to use the camera. Check one another’s work. When in doubt, consult the manual or go back to your notes from the workshop.
We suggest that you film in stages—not all at once. It makes sense to film a roll or two at the most, get them processed at the lab, screen them and then make plans for your next film attempt. We’ll schedule some lab runs in the next week or so. All your film should be at the lab by Friday of week 4—at the latest.
Likewise, it’s a good idea to not try to edit the film in just one session. Schedule your editing sessions so that you have time to view and reflect on what you’ve got, perhaps shoot more footage, and then re-edit sections.
DESCRIPTIVE ANIMATION STUDY
There are three main learning goals in this assignment:
- One is for you to practice basic animation principals covered in the first workshops such as plotting paths of action, timing eases in and out to create anticipation and exploring the expressive qualities of various approaches to mark making when animated.
- Second, in this exercise, you should explore the three different types of signs described by Pierce in Practices of Looking. Use symbolic, indexical and iconic imagery to create a visual description a specific object, being, place, or process outside of yourself. This means you should think in terms of including written, drawn and/or collage elements that are symbolic or iconic (these could be representational drawings or diagrammatic sketches) as well as imagery derived from rubbing, printing, photographic or other approaches to making an indexical mark. If the subject of your piece is small enough to fit under the camera, you could also animate that.
- Third, this is an opportunity to make the tools of the 2D labs your own, so try out the different features of Dragon Stopmotion as you are shooting.
This is a study, so the expectation is that you will think about various ways to represent your subject and try them out. You are not expected to produce “finished” work.
Students with previous college level animation experience should raise the bar on themselves; be intentional about how different visual elements are timed, framed and presented.
Here are the parameters:
- 6 seconds minimum, 30 seconds maximum.
- Silent.
- 12 drawings minimum (drawing loosely defined, but on animation bond, registered and punched)
- Minimum of 3 seconds of under-the-camera work
- Use of a path of action in at least one shot.
- 4:3 aspect ratio
- Work on your own or in pairs.
Process
- Look at your schedule and sign up for time.
- Brainstorm what you want as your subject and experiment with the different ways you could represent it.
- Test your animation on the Lunchbox or in the 2D Lab.
- Shoot in the 2D Animation Lab (I recommend on twos or threes, but students with prior experience should explore timing with different frame rates).
- Export files to Quicktime movie using SD (4:3 aspect ratio, not 16:9), 1024 by 768 pixels.
- Label the file “YourName_DAS.mov”
- Test the Quicktime movie by playing it in Quicktime.
- Copy your .mov file to your cubby on Orca by 8 am, November 3rd (Wednesday of week 6).
- Write a reflection in your journal about what you learned from this assignment, what new ideas it may have given you and what you might do differently if you were to do it over again.
SOUNDSCAPE (2-4 minutes) Due Wednesday, Nov. 17
With this assignment, you will be designing a soundscape. This involves selecting and/or creating sound elements, recording them, editing them and mixing them together to create a sound environment. This exercise requires technical skills, a clear concept and a design. There are no images; you are creating a purely acoustic and conceptual experience.
1. In groups of 2-4: choose/design a sound environment—this should correspond to a nonfiction environment, although you have latitude about how it is to be interpreted.
2. Consider possible sound elements that would make up this enviroment. Draw on your week 4 readings for guidance. Consider the following:
Sound is metaphorical as well as literal (Chion)
Distinctions between “hi-fi” and “lo-fi” soundscapes (Schafer)
Utilizing a range of sounds: not all muscle sounds (Schafer)
Utilizing audio equivalents of “figure,” “ground” and “field” (Schafer)
Incorporating keynotes, signals and soundmarks (Schafer)
3. As a group, discuss the experience you want your listener to have. Consider Chion’s distinction between causal, semantic and reduced forms of listening. They are not mutually exclusive, you could have sound elements that evoke all these listening experiences simultaneously, or in close proximity.
Is perspective important? Are you creating an immersive environment, or a sound experience that your listener can “enter,” move through, and “exit”? Consider dynamics, timbre, frequency, rhythm and other acoustic dimensions of sound. Use multiple microphones (think of these as equivalent to changes in perspective—or focus).
As part of your planning process, draw a graphical score of your sound elements*–due Tuesday of week 6 (Nov. 2nd) in seminar.
4. You may use audio processing to change the speed or pitch, or to filter your sound.
Remember Chion says literal sounds that correspond to an object or event are not always the most effective when recorded (crunching cornstarch sounds like footsteps on snow). Be imaginative about recreating sounds or adding new dimensions to an environment through sound.
Do not use composed or pre-recorded music! If the music is “diegetic” (that is, part of the sound environment), then it makes sense to incorporate it, but otherwise, no.
5. Record your soundscape with zoom recorders and exterior microphones; edit in Peak and mix with Digital Performer software. When finished, burn a CD for class. Each group member should upload the audio file to your own cubby on Orca. Clearly label your soundscape, using a title that incorporates your first names.
6. As a group, write an artists’ statement that describes your intention with this work and something about the process of production. See Kai Tillman’s artist statement for Acoustical Vestige for an example of this.
CRISIS RESPONSE PROJECT
How do we use media to engage with current events, ongoing crises in particular? This assignment is designed to get you thinking about how to address social crisis situations through media, and to consider how your media activism might contribute to an easing of a particular situation, either by intervening in it or highlighting solutions that others have begun to implement.
The assignment is divided into two parts. The first part, to take place fall quarter, involves collaborating in a group of 4-6 other students to identify a crisis on which to focus, researching different aspects of it, preparing a presentation to the class on it, and developing a treatment that describes a media project that you might produce winter quarter.
A scan of the daily newspaper over the course of a week will yield numerous crisis situations: the recession and jobless rate, the effects of climate change, insecurities in food production, health care and education, the effects of racism or xenophobia on communities, environmental disaster, war(s), etc. We would like you to consider how one such crisis affects a local community (within western Washington, or the Puget Sound region).
This quarter:
1) Research: inform yourselves about the topic. Complete a literature search about it, and review media reports about it as well.
2) Create an annotated bibliography to which each group member has contributed a minimum of five sources. Annotation means that you have read or reviewed the source and written a concise paragraph about it that describes the content, the author’s point of view and what you can tell about their reliability, and how it fits into other literature/media about the topic that you’ve reviewed. Explain what makes the source significant or credible. A source may be significant but not credible. Its significance may be because it wields great influence on the public discourse about your topic. In your annotation, you should explain why it’s not credible, and what influence it has. Generally, to know that a source is credible requires that you find other sources that back it up, or you investigate how the source you’re citing came to its conclusions.
3) Your research may lead you to names of people who you might want to contact in winter to interview. Write a sentence about how each of those people are involved in the topic. (We will go over interview ethics, protocols and techniques early in winter quarter, so you should wait until then to request interviews of anyone.)
4) Create a separate list of media sources (video, television, radio or web sites) to which each group member contributes at least three items, and annotate these as well demonstrating critical thought as to biases, accuracy and audience. Include the format(s) of each media source (cable tv, broadcast tv, web, radio, newspaper, etc).
5) Ask questions: Who does the crisis most impact? What are the parameters? Is this a local crisis only or a local manifestation of a broader crisis? What are the apparent causes of the crisis? What things might be exacerbating it, even though they didn’t cause it?
6) Visual/aural research: begin to identify images, documents, audio and video clips that might help you describe the crisis to the class. Your group could create a folder in the workspace folder of our program share on Orca and compile clips and images there.
7) In your group, share your research, and compile it in outline form to describe the issue. An introductory paragraph and outline for this are due with the annotated bibliography and media source list on November 10th (week 7). In the outline, identify who in the group will write each section.
8) Write up your findings as a research paper and discuss how your topic has been represented in the media with reference to the different ways of framing discussed in Ryan’s Prime Time Activism (the chapters Getting Framed and Framed Contests will be available on the program blog as pdfs). Format your writing double spaced, 12 point type, and proofread for clarity and spelling. Use MLA guidelines for in-text citations and the bibliography (works cited) page. These can be found at http://owl.english.purdue.edu/owl/resource/747/01/
9) In your group, brainstorm various ideas for a media response to your topic. Settle on a minimum of 2 ideas, and write a short treatment of each that describes the approach, content, medium, and style of the project, as well as what resources (in terms of people and facilities) you’d need to produce it. Relate your idea to media about the topic that already exists. How will yours differ? This is due week 9 with your research paper. Options for production in winter include animation, film, audio as well as television production in the CCAM.
10) Prepare a 10 minute presentation to the class about your topic. Include an additional 5 minutes to describe your ideas for addressing it through media in winter quarter.
11) The research paper, treatments of media responses and the class presentation are all due Wednesday of week 9.
SELF-REPRESENTATION PROJECT (VIDEO)
So far this quarter we have used media to explore ways of observing and looking at the world. As we move into digital video production, we’d like you to turn inward and explore what it means to represent yourself.
Identities are rarely, if ever, monolithic, static or simple. As we grow and learn, we change. Even as we progress through our daily routines we may shift or adopt identities depending on the situation (at work, at home, with strangers, etc.). Many of you may already have some experience with the most prevalent form of self-representation these days – social media sites such as Facebook. For this assignment, we hope that you will go deeper and consider how you might represent aspects of yourself or your identity that are not so easily defined, or that may only now be emerging.
As you develop your ideas for this project bear in mind that we don’t expect you to present an exhaustive study of yourself. You can focus on one particular aspect. You can also explore some of the complexities of your identity as we’ve started to learn about them in recent readings and screenings—how might these complex ways of thinking be useful and relevant to the representation of our own identities?
You can choose one of a number of forms. Here are some possibilities:
Self portrait
Domestic ethnography
Autobiographical object
Memory of a specific incident or time period
Parameters:
*Length—3-6 minutes
*Design—this assignment requires careful planning of ideas, structure, images and sound. Your concept and design are as important as the completed work, so you need to demonstrate your planning process through writing or images. Your video should be storyboarded. You should have production notes on scenes, locations, visual and audio strategies, lighting techniques (if you choose to use lights), and the blending of live action and animation. When your video is complete, write a thoughtful reflection on (1) what you set out to do; (2) what was personally important to you about it; (3) what you learned from the process and will carry forward into your next projects; (4) what you would do differently next time.
*Your video should include both live action and some form of animation (if you rotoscope, only use original footage.)
Be intentional about locations and about use of lights. Consider what light can add to an image and how it can be used to interpret or communicate.
We recommend that you use tripods (unless you have a good reason for a hand-held image)—the 3-chips are hard to hold steady.
*Sound—consider carefully what you want the relationship between sound and image to be. As we’ve learned, images can be realistic—often involving synchronous sound–but they don’t have to be. Even soundtracks that sound “realistic” are usually carefully constructed and contain many levels and types of sounds. For this assignment, you may use sound to support the realistic qualities of an image—you may also use it expressively, or to communicate information, concepts or emotional experiences that the image alone can’t provide. All uses of sound should be intentional and carefully crafted. No commercial (pre-recorded) use of music, please. Please use exterior microphones—no in-camera mikes.
*The live-action parts of your piece should be shot in standard definition mini-DV format using the 3-chip video camera. This means a 4 x 3 aspect ratio and 640 x 480 resolution. (Animation should also be 4 x 3 aspect ratio). The whole work is to be edited in Final Cut Pro (soundtracks can be exported to Digital Performer for additional processing if desired).
*Finished pieces should be printed back to mini-DV tape for screening. Store your media files and project files on an external hard drive, if you have one. Otherwise, export to a Quicktime file and upload the file to your cubby—unfortunately, it won’t be possible to preserve all your FCP media files on Orca. You can also make a DVD using the “Share” function in Final Cut Pro.
*You can explore individual or collective self-representation. If your project is an individual one, you will still be working with at least one project partner with whom you be sharing the camera. Expect to assist each other in developing ideas, providing production assistance, and giving feedback about edited work in progress.
*There will be a Work in Progress (rough cut) review of all work on Tuesday of Week 9. A rough cut includes the footage you intend to use, and has a well-developed editing structure, but is not finished. Generally, transitions, titles, subtitles, final timing of shots and often some sound elements (and elements that need audio or visual processing) are added after you’ve given your arts community a chance to respond to and critique your work. Sometimes the filmmaker rethinks the structure, pace or presentation of their work based on the responses of the viewing audience.
*Self-Representation Videos, along with written final reflections are due either Tuesday or Friday of week 10 (depending on the screening date that you signed up for).
CRITIQUE GUIDELINES: PRESENTING AND RECEIVING WORK IN PROGRESS
Work in progress screenings help presenters improve their work. As viewers we have a responsibility to respond in a way that helps each presenter build on their strengths and explore solutions to areas that need development.
There are important differences between criticism and critique. Criticism is impersonal and authoritative. It is about work that is finished. Critique is personal and should function as an exchange or dialogue between the maker and the viewing community.
Guidelines for the Viewing community
Tell the maker what you experienced and understood. Be specific. This helps the maker know whether their work was received in the way it was intended. Use I-statements—take responsibility for your responses; build a dialogue with the maker.
Be specific about what you think is working well. Important elements to discuss are: technical skills; aesthetic quality of imagery; construction (scripting, editing); development of main issues and ideas; exploration of sensitive subjects; effective moments or images; pacing; transitions…
Be specific about what you think needs to be improved. Is the pacing too slow or fast? Are there sections that need more development? Did aspects of the film confuse you? Are there technical problems that interfere with your viewing experience?
We can discuss how an issue, person or group is represented. How did the maker address the politics and ethics of representation in their work?
Respect diversity in the group. Our goal is to support the maker’s aesthetic, conceptual and technical development. With that in mind, it is very helpful to suggest specific strategies for improving the work.
Guidelines for Makers
You can begin a work-in-progress screening with questions you’d like the viewing community to address.
Do not excuse or explain your work. Do not point out what is missing, or what you intend to do later, or had technical difficulties with.
Take notes on the critique. If you don’t understand a suggestion, ask for clarification.
If there’s time at the end, we will ask you some questions or invite you to comment on what you just heard.
SELF-EVAL WORKSHEET
Use this to brainstorm ideas for your fall quarter self-eval. Use extra sheets if necessary. Include it with your self-eval and portfolio.
- What program work did you learn the most from this quarter? What learning are you proudest of? Why?
- What are the most significant ideas you learned about nonfiction media making? How have these affected the ways you view media and think about media?
- What are the most significant conceptual skills you learned? If this work posed challenges, describe what efforts you made to overcome them.
- What did you learn about collaboration? Which collaboration skills did you strengthen this quarter? What challenges did collaborative work present, and how did you work to overcome them?
- What are the most significant technical concepts and skills you learned? If this work posed challenges, describe your efforts to overcome them.
- Did you do all assigned readings? Which did you slight or not read? What sort of demands did the readings make of you and how did you deal with them?
- Review your notes for readings, screenings, lectures and discussions. What major themes most interested you? How might you explore them further?
- What effort did you put into seminar preparation? How did this affect your participation and contribute to the quality of the seminar experience? Describe any changes in your seminar participation since the beginning of the quarter.
- Did your work habits improve this quarter? How well did you manage your time and organize your work on assignments? If you could do it all over again, what would you do differently?
- How have lectures, readings, seminars, critique discussions, your work in 16mm film, animation, sound, video and the crisis response research influenced your understanding of creativity and media practice, including your own? Describe any insights about media, creative practice or visual culture that you have as a result of this work.
- In what ways this quarter have you made progress towards the six expectations of an Evergreen grad? (These are: 1) Articulate and assume responsibility for your own work, 2) Participate collaboratively and responsibly in our diverse society 3) Communicate creatively and effectively 4) Demonstrate integrative, independent, critical thinking 5) Apply qualitative, quantitative and creative modes of inquiry appropriately to practical and theoretical problems across disciplines 6) Demonstrate depth, breadth and synthesis of learning and the ability to reflect on the personal and social significance of that learning.)
- Describe any changes in your educational and/or career goals this quarter.
Writing your self-evaluation:
Re-read your answers. Note what you think is significant about your learning this quarter and write a list of topics (i.e. a scope) that you think are most important to address. Compose an introductory paragraph that describes your intentions for the quarter and frames your learning in terms of these topics. (If you are new to Evergreen, mentioning previous college or other life experience will help orient the reader.) Write a paragraph about each of these topics in which you expand on ideas mentioned in the introduction. Write concise, complete and focused sentences. Choose convincing and descriptive evidence to show, not tell, how and what you learned. Write a conclusion that summarizes your accomplishments and/or discusses how your learning this quarter will help you achieve future goals. Aim for the standard length of about one page per quarter.
PROOFREAD OUT LOUD! You will catch more errors and awkward phrasing if you read aloud to another person. Note spelling, grammar, word usage and make necessary corrections. This self-evaluation will appear in your final, official transcript, so it should represent yourself in the best light.