Section 6: The Database Design Workspace
The workspace is where a database design is laid out. Templates are selected from the template catalogs, and instances of those templates are placed into the workspace. It is here also that relationships between entities and observations and among entities themselves are made clear to the application. The Data Design tab contains the workspace pane, which provides a view into the workspace that is currently being worked in. This section of the guide describes the various ways in which one can interact with the workspace through the Database Designer application.
Adding Entity Templates to the Workspace
To add an instance of a particular entity template to the workspace, double click on the name of that template where it appears on the catalog panel. After you do so, the Template Preview pane will be activated, and you'll have the opportunity to review the various attributes of the selected template. To complete the addition of an instance of the template to the workspace, click on the Add Template to Design button. If, on the other hand, you decide you do not wish to place an instance of the template after all, simply click on the Data Design tab to reactivate the workspace pane without adding the template.
The following subsections provide an overview of some of the issues you might encounter when adding an instance of an entity template to the workspace.
Entity Already in Workspace Error
At most one instance of a template with any given entity name can be present in the workspace at once. If you attempt to add to the workspace an instance of an entity template that has entity name N and an instance of some entity template of entity name N is already present in the workspace, an error dialog will be displayed, letting you know that what you have attempted to do is not allowed.
The meaning of "entity name" will now be given. Recall that in the section on relationships between entities it was stated that an entity template can have a dependency on another entity template. An entity template's entity name plays an important role in determining whether or not the template can satisfy any given general dependency possessed by another entity template. The group of templates that are capable of satisfying a particular general dependency is characterized by two pieces of information: the template collection in which the satisfying template must reside (the template may also reside in a subcollection of the collection specified), and the entity name that all candidate templates have in common. Each of the Branch templates in the protected catalog, for example, has a general dependency on something of entity name "Stem" that lives in the collection "Canopy Studies Templates/Stems". There are nine entity templates that meet these two criteria, and therefore there are nine templates that can be used to satisfy a Branch's dependency on a Stem.
An entity template's entity name also appears in the generated database as a table name, when a table is created for an instance of that template.
Auto-resolved Dependencies
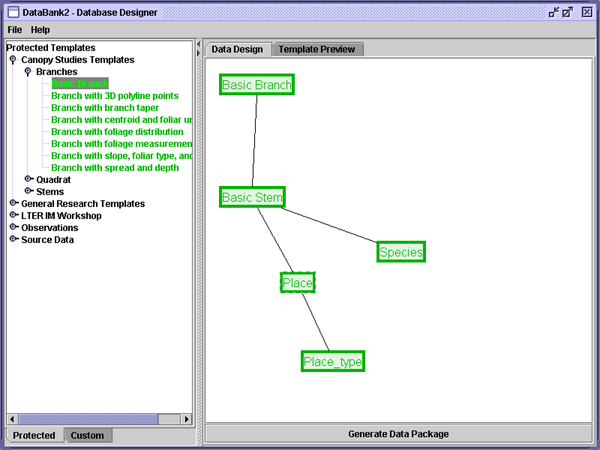
In some cases, after you have told the program to add an instance of a particular entity template to the workspace, you'll notice that, in fact, more than just one entity was added. This happens when the template you choose to instantiate has a specific dependency on an entity template not already instantiated in the workspace. For example, the protected template Place, located in the General Research Templates collection, has a specific dependency on the Place_type template within the same collection. If you choose to add an instance of Place to your workspace and an instance of Place_type is not already present there, an instance of each will be added. If, on the other hand, an instance of the latter template is already there, that instance will be used to resolve the specific dependency of the newly-added Place template. A (resolved) dependency between two entity template instances in the workspace is indicated by a line drawn between their representations on the workspace pane.
Unresolved Dependencies
It is always possible for the application to automatically resolve a specific dependency by, if needed, inserting an instance of the depended-on template into the workspace. It is not always possible, however, for it to resolve an occurrence of the other type of dependency, the general dependency, when one is possessed by an entity in the workspace. This is because there usually exists more than one template that can be used to resolve a particular general dependency, and the choice of which one of those to use must be made by the user. As a result, one of two things will happen when you add an instance of an entity template with a general dependency to the workspace:
- A template already in the workspace will be used to resolve the newly-added template's general dependency. This occurs if one of the templates in the workspace satisfies the appropriate criteria (i.e., it has the proper entity name and is contained within the proper template collection, as described above).
- An indicator of an unresolved dependency will appear on the workspace pane. This occurs when no template instance in the workspace meets the criteria it must in order to satisfy the newly-added entity's general dependency. The indicator appears as a red rectangle, as in the picture below. Right clicking on the rectangle causes a menu to appear from which you can choose the entity template that will be used to resolve the dependency.
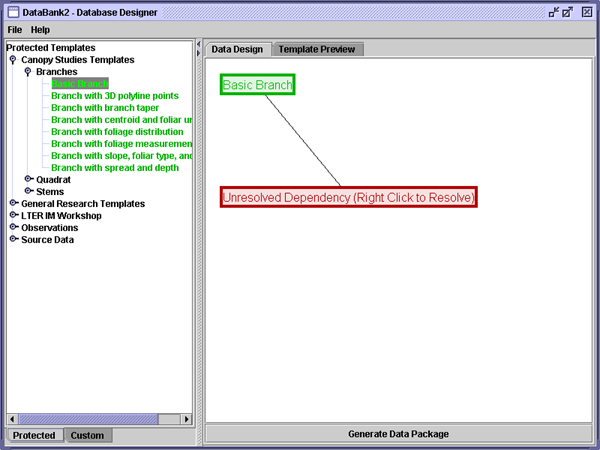
A workspace with an entity that has an unresolved general dependency
Built-in Observations
Some entity templates in the protected catalog come with built-in observations — observations that are automatically placed on every instance of that template in a workspace. These observations may be hidden by default. It is not currently possible to give custom templates built-in observations by using the template editor.
Adding Observation Templates to the Workspace
Recall that an instance of an observation template in the workspace is always related to a particular entity template instance. As a result of this, you must let the program know, for each observation that you add to the workspace, which entity that observation is to be added to. You can approach this from either of two directions:
- To add an observation to a chosen entity, right click on that entity's representation on the workspace pane and select the observation you wish to add from the Show Template... submenu available on the popup menu that appears.
- To add an observation selected from the catalog to the workspace, double click its name where it appears on the catalog pane, then click the Add Template to Design button on the Template Preview panel. You will then be asked to select the entity on which you would like the observation to be added.
Relationship Quantifiers
Regardless of which method you use to do it, every time you add an observation to the workspace, you will be prompted to specify a relationship quantifier that further clarifies the nature of the relationship between entity and observation. The desired relationship quantifier(RQ) is selected from two options, labelled "once" and "more than once", that are presented to you on a dialog box when you move to instantitate the observation. "Once", corresponding to the word "one-to-one" in database terminology, and "more than once", which corresponds to "one-to-many", answer the question, posed by the dialog just mentioned, "How often do you plan to record this observation?". If you need space in the generated database to record the data collected for just one measurement of the attributes comprised by the DataBank observation in question, select the "once" option; selecting this option results in the simplest database. If, however, you intend to take a given observation more than once — perhaps you will record it once a day, or separately for different sections of the object under study — choose the "more than once" option, and you will have all the space you need.
Other Workspace Manipulations
There are a number of other actions that you can perform on your workspace. The following subsections describe these actions and how to perform them.
Saving and Restoring a Workspace
You can save the current workspace to disk, or restore a previously-saved workspace into the Designer by selecting either Save Workspace or Open Workspace, as appropriate, from the File menu.
Removing an Instance of a Template from the Workspace
A specific instance of an entity or observation template can be removed from the workspace by clicking on the template's representation on the workspace pane, and pressing the delete key. The same effect is had by right clicking on the template's representation and choosing the Delete option from the popup menu that appears.
Showing and Hiding an Entity's Observations
It is possible to "hide" an instance of an observation template, so that a representation of it does not appear on the workspace pane. This should be done simply to reduce visual clutter on the screen; it has no effect on the database that is generated from the workspace. To hide a specific observation instance, right click on its representation, and choose the Hide this Observation option from the popup menu that appears. To hide all of an entity's observations at once, right click on the entity's representation, and select Hide All Observations on Entity. Hidden observations can be unhidden by right clicking on their entity's representation, and choosing the Show All Observations on Entity option, or choosing from the Show Specific Observation on Entity... submenu.
Note that some built-in observations may be hidden by default.
Grouping Entities
Another way to reduce clutter on the workspace pane is to place two or more entities into a group. As with observation hiding, grouping of entities has no effect on the generated database. To create an entity group, select the representations of the entities you want to make part of the group, then press the G key, or right click on one of the entity representations and select the Group Selected Entities option from the popup menu that appears. After doing so, the green rectangles representing the grouped entities, and any blue rectangles on the workspace pane representing observations on those entities, will be gone, and in their place will be an orange rectangle representing the group. By default, this rectangle is labelled Group, but the label can be altered by double clicking on the group rectangle and editing the text in the text-entry field that appears.
To undo the grouping, select the representation of the group on the workspace pane and press the G key. Another way is to right click on the representation and select the Ungroup option from the popup menu that appears. Note that any observations on the grouped entities will remain hidden after ungrouping and must be unhidden via a separate action.
View of a workspace before grouping
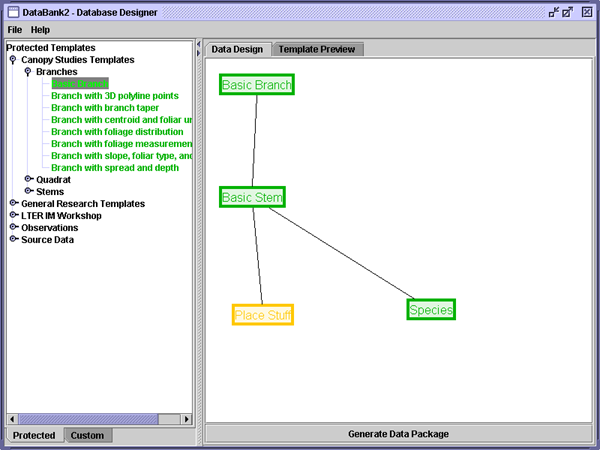
View of the same workspace with the Place and Place_type entities grouped
Other Manipulation
By right clicking anywhere within the empty space on the workspace pane (i.e., in space not occupied by a representation of a template, unresolved dependency, group, or connecting edge), you can access the options to erase everything from the current workspace (Clear Workspace) and to ask the program to try to find a better layout for the things on the workspace pane (Arrange Templates).
Information on the details of a specific entity template instance's template can be viewed on the Template Preview pane by right clicking on that instance's representation on the workspace pane and choosing the Show Template... option from the popup menu that appears.